Difference between revisions of "ReNamer:Managing rules"
(→Adding rules: removed some small button images) |
|||
| (22 intermediate revisions by 3 users not shown) | |||
| Line 1: | Line 1: | ||
| − | + | {{Go|up=ReNamer:Step-by-step|prev=ReNamer:Adding files and folders|next=ReNamer:Previewing files}} | |
| − | + | This section explains how to add rules, remove rules, edit a rule and change the order in which they are applied to files and folders. | |
| − | |||
| − | |||
| − | |||
| − | |||
| − | |||
| − | |||
| − | |||
| − | |||
| − | |||
| − | |||
| − | |||
| − | === | + | === Adding rules === |
| − | |||
| − | + | #Rules can be added by using any of the following methods: | |
| − | + | #*Click the [[Image:AddRuleButton.png]] button, | |
| + | #*Click inside the '''Rules''' area, | ||
| + | #*Press the '''Ins''' key when the ReNamer window is active. | ||
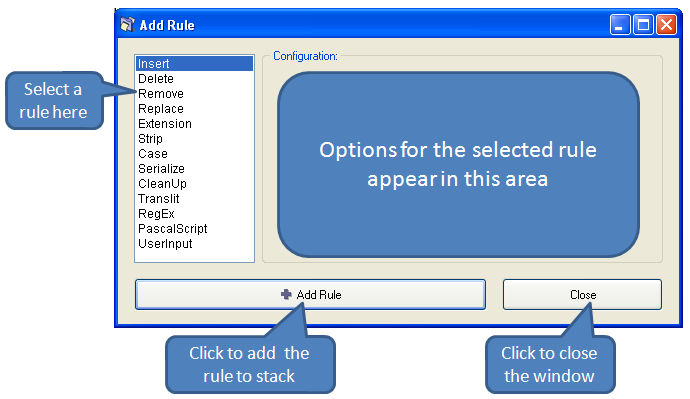
| + | #The '''Add Rule''' window pops up: | ||
| + | #:<center>[[Image:HowAddRulesWorks.png]]</center> | ||
| + | #:[[ReNamer:Managing_rules#Selecting_a_rule|Select]] the desired rule. | ||
| + | #The options for the selected rule appear immediately in the '''Configuration''' area (at right). | ||
| + | #:Set the desired parameters, as explained in each rule. | ||
| + | #Press the [[Image:AddRuleButton.png]] button at the bottom of the window. The rule is added to the stack and the window is closed. | ||
| + | #Repeat steps 1-5 to add more rules. Each new rule is added at the end of the stack. | ||
| + | # To close the window without adding a rule press the "Close" button (or the window close icon at the top right corner). | ||
| − | + | === Removing (deleting) rules === | |
| − | + | To remove an existing rule, [[ReNamer:Managing rules#Selecting_a_rule|select]] it and press '''DEL''' or click on the [[Image:RemoveButton.png]] button. | |
| − | |||
| − | === | + | === Changing the order of the rules === |
| − | |||
| − | + | All rules are applied to each file in the order they appear. Even with the same set of rules, the end-result can be very different if the order of the rules is changed. | |
| − | |||
| − | |||
| − | + | You can change the order of rules using any of the following methods: | |
| − | + | #Using the [[Image:UpButton.png]] and [[Image:DownButton.png]] buttons. | |
| + | #Pressing '''CTRL''' + '''Up/Down''' arrows. | ||
| + | #Drag-and-drop any rule with mouse. | ||
| − | + | === Editing rules === | |
| − | + | Editing a rule means changing its parameters and options, and then saving the rule. | |
| − | |||
| − | You can | + | You can edit a rule using any of the following methods: |
| − | + | #Double-click on it, | |
| − | + | #Right-click on it and select the '''Edit Rule '''option | |
| + | #[[ReNamer:Managing rules#Selecting_a_rule|Select]] it and press '''ENTER.''' | ||
| + | A window similar to the '''Add Rules''' window appears. There are only ''two'' minor differences: the button at the bottom is titled '''Save Rule''', and the rules list in the left pane is grayed out (because you are not supposed to select rules in this window). | ||
| − | + | Change the parameters and options, and press the '''Save Rule '''button or '''ENTER'''. | |
| − | |||
| − | |||
| − | + | === Selecting a rule === | |
| − | |||
| − | |||
| − | + | When a rule is selected, its entire row is highlighted. Only one rule can be selected at a time. | |
| − | Only one rule can be selected at a time. | ||
| − | + | To select a rule, use any of the following methods: | |
| − | + | # Click anywhere in the row except on the check box. | |
| + | # Use the Up and Down arrow keys on your keyboard to move the selection to another rule. | ||
| − | + | === Marking and Unmarking a rule === | |
| − | |||
| − | + | A rule is marked by putting a tick in its check box[[Image:CheckedCheckbox.png]]. Conversely, it is unmarked by removing the tick [[Image:UncheckedCheckbox.png]]. | |
| − | A rule is marked by putting a tick in its check box[[Image:]]. Conversely, it is unmarked by removing the tick [[Image:]]. | ||
| − | ReNamer uses only the ''marked'' rules for the ''preview'' and ''renaming'' operations. | + | ReNamer uses only the ''marked'' rules for the ''preview'' and ''renaming'' operations. |
| − | So unmarking a rule is useful to temporarily disable the rule without having to remove it from the '''Rules''' pane. | + | So unmarking a rule is useful to temporarily disable the rule ''without'' having to remove it from the '''Rules''' pane. |
| − | To mark/unmark the rules | + | To mark/unmark the rules: |
| − | # Click on the check box. | + | #Click on the check box. |
| − | # [# | + | #[[ReNamer:Managing_rules#Selecting_a_rule|Select]] a rule and press the '''Spacebar''' (on your keyboard) |
| − | (Repeat of any | + | (Repeat of any of these actions toggles the marked/unmarked status.) |
The reasons for unmarking a rule are: | The reasons for unmarking a rule are: | ||
| − | # You want to remove the effect of a rule and see what happens to the files. | + | #You want to remove the effect of a rule and see what happens to the files. |
| − | # You have a favorite set of rules that you use often. However, you need to remove a few rules in some cases. A trick is to save the superset of rules | + | #You have a favorite set of rules that you use often. However, you need to remove a few rules in some cases. A trick is to save the superset of rules and reload them automatically each time you start ReNamer. Then in each session, unmark some rules. |
| + | |||
| + | [[Category:ReNamer]] | ||
Latest revision as of 23:32, 22 March 2014
This section explains how to add rules, remove rules, edit a rule and change the order in which they are applied to files and folders.
Adding rules
- Rules can be added by using any of the following methods:
- Click the
 button,
 - Click inside the Rules area,
- Press the Ins key when the ReNamer window is active.
- Click the
- The Add Rule window pops up:
- Select the desired rule.
- The options for the selected rule appear immediately in the Configuration area (at right).
- Set the desired parameters, as explained in each rule.
- Press the button at the bottom of the window. The rule is added to the stack and the window is closed.
- Repeat steps 1-5 to add more rules. Each new rule is added at the end of the stack.
- To close the window without adding a rule press the "Close" button (or the window close icon at the top right corner).

Removing (deleting) rules
To remove an existing rule, select it and press DEL or click on the ![]() button.
button.
Changing the order of the rules
All rules are applied to each file in the order they appear. Even with the same set of rules, the end-result can be very different if the order of the rules is changed.
You can change the order of rules using any of the following methods:
- Using the
 and
and  buttons.
 - Pressing CTRL + Up/Down arrows.
- Drag-and-drop any rule with mouse.
Editing rules
Editing a rule means changing its parameters and options, and then saving the rule.
You can edit a rule using any of the following methods:
- Double-click on it,
- Right-click on it and select the Edit Rule option
- Select it and press ENTER.
A window similar to the Add Rules window appears. There are only two minor differences: the button at the bottom is titled Save Rule, and the rules list in the left pane is grayed out (because you are not supposed to select rules in this window).
Change the parameters and options, and press the Save Rule button or ENTER.
Selecting a rule
When a rule is selected, its entire row is highlighted. Only one rule can be selected at a time.
To select a rule, use any of the following methods:
- Click anywhere in the row except on the check box.
- Use the Up and Down arrow keys on your keyboard to move the selection to another rule.
Marking and Unmarking a rule
A rule is marked by putting a tick in its check box![]() . Conversely, it is unmarked by removing the tick
. Conversely, it is unmarked by removing the tick ![]() .
.
ReNamer uses only the marked rules for the preview and renaming operations.
So unmarking a rule is useful to temporarily disable the rule without having to remove it from the Rules pane.
To mark/unmark the rules:
- Click on the check box.
- Select a rule and press the Spacebar (on your keyboard)
(Repeat of any of these actions toggles the marked/unmarked status.)
The reasons for unmarking a rule are:
- You want to remove the effect of a rule and see what happens to the files.
- You have a favorite set of rules that you use often. However, you need to remove a few rules in some cases. A trick is to save the superset of rules and reload them automatically each time you start ReNamer. Then in each session, unmark some rules.