ReNamer:Quick Guide: Difference between revisions
No edit summary |
m (Some tests with ImageMap syntax) |
||
| Line 5: | Line 5: | ||
[[Image:ReNamer Main Steps.png]] | [[Image:ReNamer Main Steps.png]] | ||
<imagemap>Image:ReNamer Main Steps.png|rect 76 58 253 82 [[ | Test 1 | ||
<imagemap> | |||
Image:ReNamer Main Steps.png| | |||
rect 76 58 253 82 [[Adding files and folders|Adding files and folders]] | |||
desc none | |||
</imagemap> | |||
Test 2 | |||
<imagemap> | |||
Image:ReNamer Main Steps.png| | |||
rect 76 55 253 85 [[Adding files and folders]] | |||
rect 303 53 393 135 [[Previewing files|See HowTo Previewing files]] | |||
rect 465 55 545 135 [[Renaming files|I use just IrfanView (or such) to make an selection to get the rectangle coordinates]] | |||
rect 3 83 295 129 [[Managing rules|See the full power of ReNamer: This section explains how to add rules, remove rules, edit a rule andchange the order in which they are applied to files and folders.]] | |||
desc none | |||
</imagemap> | |||
{| class="wikitable" | {| class="wikitable" | ||
Revision as of 21:24, 22 September 2010
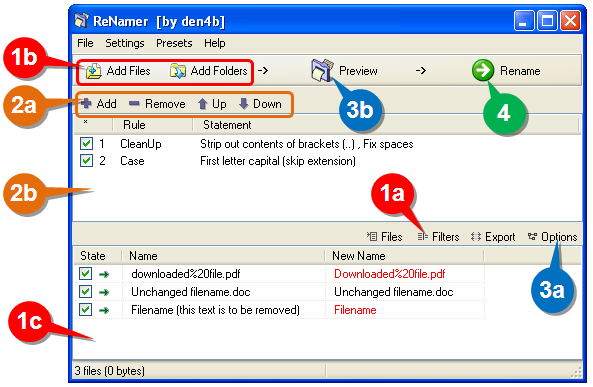
Using ReNamer is very simple. Just follow the four steps shown below.

Test 1
Test 2
| Step | What to do |
|---|---|
| 1 | Select the files from various folders and add them to the working area.
a. Change default behavior for the Add Folders button (optional step) b. Add individually selected files (Add Files) and/or all files in selected folders (Add Folders), and/or... c. Drag-n-drop files from Windows Explorer (or any other application) in this area (called "Files pane"). |
| 2 | Add rules to create a sequence. Delete or edit an existing rule. Change the order of the rules.
a. Allows addition and deletion of rules. Also change the order of any rule in the stack. b. Click in this area to add a rule (or to edit an existing rule, or just move it to a new position in the list) |
| 3 | Preview the results (check before proceeding with the actual renaming)
a. Set options (e.g. highlight changed names, experiment with your own text, resolve conflicts, etc.) b. Click to see preview the new file names in the bottom pane (not required in auto-preview mode) |
| 4 | Press this button to rename files and folders. |
ReNamer is so intuitive that you would be able to use it without reading the manual any further.
The rest of the chapters provide more details on all aspects of ReNamer. Use them as reference.
There is an older version of this guide available here: ReNamer:Quick Start