Workflow
The workflow of Shutter is a simple 3-step process:
- Add events that are to be monitored.
- Add actions that are to be executed when the specified events occur.
- Start monitoring for the specified events.
Shutter monitors for the events to be triggered according to the selected logic, then all actions will be executed one by one. Note that individual events are not directly linked to individual actions, but the lists of events and actions are linked.
You can consider that a single instance of Shutter has a single active schedule (preset). If you need multiple active schedules, you need to start multiple instances of Shutter each with its own schedule.
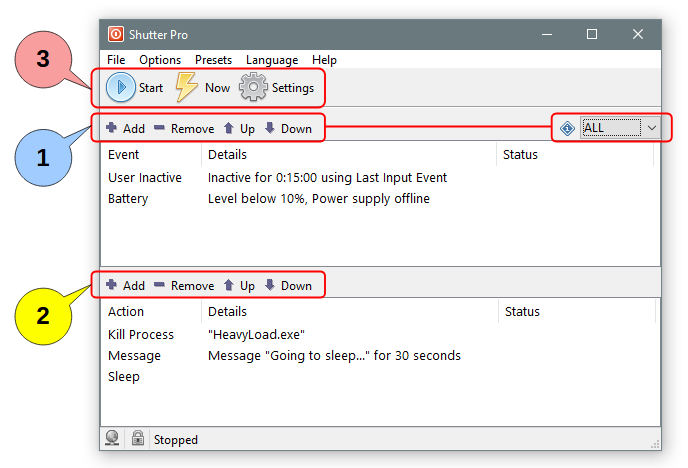
Step 1: Add Events
Events are usually based on periodic checking of a system state, execution state of a process, or some other trigger. You can add multiple events, and also set the logical relationship between them to define the criteria for executing actions.
In this step we set up and configure the events, while the monitoring begins at a later step, as outlined below.
Logical relationship
When you add multiple events, their interrelationship becomes important. The actions are executed only when the relationship between the specified events is satisfied. You are offered the following logical relationship options:
- ALL - All events are in triggered state at the same time, monitored continuously. This is the default choice.
- AND - All events have been triggered once, independently of each other.
- OR - Any event has been triggered once.
- 1BY1 - Each event has been triggered once, one after another.
Step 2: Add Actions
Actions are executed one by one, from top to bottom.
You can add as many actions as you want, but please be aware of the following factors:
- Each action can affect the execution of the other actions listed below it.
- To avoid that, you may have to change the order of the Actions by moving them up/down.
- Certain actions are terminal: They can close Shutter, log out the user or shut down the PC.
- Such actions must be placed at the very end of the actions stack. Otherwise the actions listed below them will never be executed.
Step 3: Start monitoring
Press the  button. Shutter starts monitoring for the events.
The button changes to  button. Press it if you want to stop the monitoring of events.
Shutter also has a  button, which starts all actions without waiting for triggering the events.