Main menu
TODO: Proof read, upload images, update links.
This article describes options available in the main menu.
File menu
| Option | Shortcut | Description |
|---|---|---|
| New Project | CTRL+N | Create a new project. Clear all rules and files. |
| Undo Renaming | SHFT+CTRL+Z | If possible, reverses the effect of the last renaming operation. |
| Paste Files | SHFT+CTRL+V | Pastes the selection of files/folders from the clipboard into the Files pane. |
| Add files | F3 | Opens a window for selecting files from any folder and adding them to the Files pane. |
| Add folders | F4 | Opens a window for adding whole folders, according the configured filter settings. |
| Preview | F5 | Generate new names by applying renaming rules. Not required if the auto preview option is enabled. |
| Rename | F6 | Rename all files to names shown in the New Name (New Path) column in the Files pane. |
| Exit | ALT+F4 | Close the application. |
Settings menu
| Option | Shortcut | Description |
|---|---|---|
| All Settings | F8 | Opens the Settings dialog. |
| General | Shows the General tab of the Settings dialog. | |
| Preview | Shows the Preview tab of the Settings dialog. | |
| Rename | Shows the Rename tab of the Settings dialog. | |
| Meta tags | Shows the Meta Tags tab of the Settings dialog. | |
| Miscellaneous | Shows the Miscellaneous tab of the Settings dialog. | |
| Filters | CTRL+F | Changes the default behavior when adding folders, and allows specifying filtering based on file mask.
See the Filter settings article for more information. |
Presets menu
See also how to use presets.
| Option | Shortcut | Description |
|---|---|---|
| Load | Opens a submenu with a list of all available presets. Click on a preset to load its rules in the Rules pane. If the preset was saved with any filter settings, they will also be set.
Be aware that all current rules will be lost if not saved. If you want to add a preset to the current rules stack, you can use the Append preset option in the Preset Manager. |
|
| Save As... | CTRL+S | Saves the current preset. |
| Manage | CTRL+M | Opens the Preset Manager dialog. |
| Browse... | Browse to folder where presets are stored (via Windows Explorer). | |
| Import... | Select presets from any location in your file system to import (copy) them into ReNamer's Presets folder. | |
| Create links | The following window pops up:
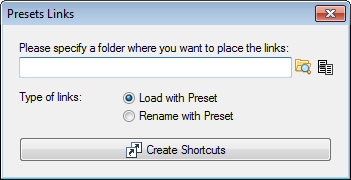
Shortcuts (also known as "droplets") will be created for every available preset and placed in the specified folder.
WARNING: Be careful with the Rename with Preset option. It will rename files without asking for your confirmation. |
|
| Rescan | Scans the preset folder for new presets. Useful if you have manually modified the content of the presets folder as you don't have to restart ReNamer to use them. |
Help menu
| Option | Shortcut | Description |
|---|---|---|
| Help (online) | F1 | Open online manual. |
| User Manual | Opens "User Manual" file which is distributed with the application (PDF format). | |
| History | Opens "History.txt" file which is distributed with the application. The file contains the list of changes for the current and previous versions. | |
| About | Alt+F1 | Shows a dialog that provides you with general information about ReNamer, and contact details in case you are facing any difficulties that are not covered in this manual.
A right click on the white header of the dialog will place ReNamer's version information to the clipboard. |