Using presets
A preset is a named collection of rules that can be saved and reloaded on demand. Presets can also store filter settings, making it easy to reuse complete renaming configurations across sessions. Presets can also be used for unattended renaming via command line.
Saving a preset
- Set up the desired rules in the Rules pane. Optionally configure filter settings to include with the preset.
- Press
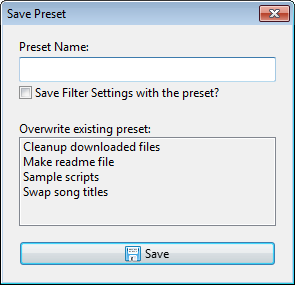
Ctrl+S, or use Presets » Save As from the main menu. - Enter a name for the preset, or select an existing preset from the list to overwrite it.
- Check the option to include filter settings if needed.
- Click Save.
Press Esc or close the dialog to cancel without saving.
Loading a preset
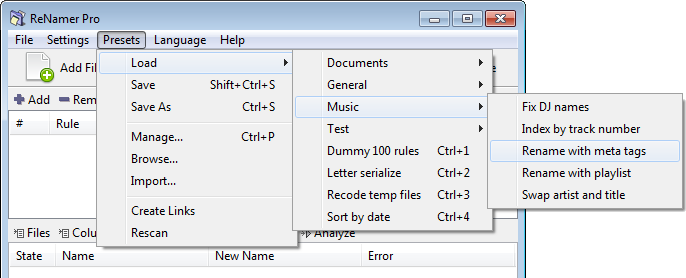
Presets can be loaded via Presets » Load in the main menu or via the Presets Manager.
Loading a preset replaces the current set of rules. To add rules from a preset to the existing stack instead of replacing it, hold Shift while selecting the preset from Presets » Load.
For quick access, the first nine presets can be loaded directly using Ctrl+1 through Ctrl+9. Presets are ordered alphabetically, so their shortcut assignment can be controlled by renaming them.
Managing presets
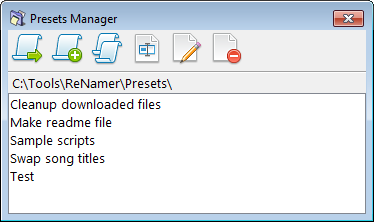
The Presets Manager provides a dedicated interface for loading, appending, copying, renaming, editing, and deleting presets. Open it via Presets » Manage or by pressing Ctrl+P.
Presets directory structure
Preset files can be organised into subfolders, which is useful when managing a large collection. To save a preset into a subfolder, include the folder name in the preset name when saving, using a backslash as a separator. For example, entering Music\Cleanup saves a preset named Cleanup inside a Music subfolder.
Presets can also be rearranged manually by browsing to the presets folder via Presets » Browse and moving the files in Windows Explorer.
Locating and transferring presets
Presets are stored as *.rnp files in a Presets folder on disk. The exact location depends on the installation type:
- In a portable installation, the
Presetsfolder is located in the same directory asReNamer.exe. - In a standard installation, it is located in the user profile folder.
The full path is shown at the top of the Presets Manager window. The Presets » Browse menu option opens that folder directly in Windows Explorer.
To transfer presets to another computer or installation, copy the *.rnp files from the source presets folder and place them in the presets folder on the target, or import them via Presets » Import.
See also Application Data Storage for more information on locating application data.