Adding files and folders
TODO: ProofUpload read, upload images, update links.images.
InThis thispage section, we will seeexplains how to place filespopulate and folders in ReNamer's working area (also calledmanage the Files pane)., Thisthe consistscentral of:
The Add Files and Add Folders buttons on the pane,main and
ReNamerseveral has multipleother methods forare theseavailable actions, asand described below.
Adding files using the "Add Files"Files buttondialog
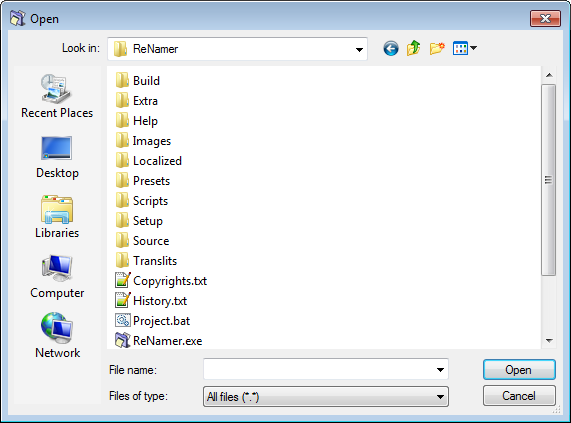
PressClick the
windowfileshownopenabovedialogpops up.appears.- Navigate to the required folder and select the desired files.
PressClickOK.OK. The selected files are added toReNamer'sthe Files pane.- Repeat
steps 1-3to load files fromotheradditional foldersifas needed.
Adding items using the "Add Folders" button
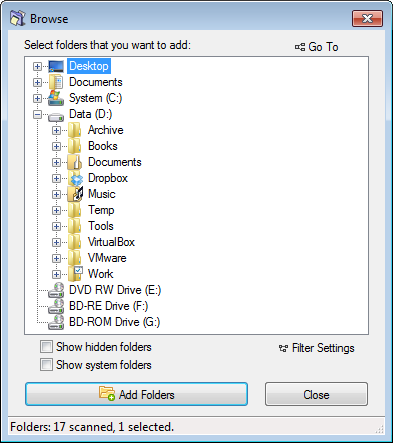
 button. The window shown above pops up.
Adding files using the drag-and-dropAdd Folders dialog
Adding files using the Add Paths dialog
The Add Paths option in the main menu opens a dialog where file and folder paths can be entered or pasted directly as text.
Which items are added from each path follows the same Filter settings as the Add Folders dialog. Unlike the standard dialogs, Add Paths also supports the long path specification (\\?\), making it the appropriate method when working with paths that exceed the Windows 260-character limit. See Long paths for more information.
Adding files using drag and drop
Select the files in any application and drag-and-dropdrag them into ReNamer'sthe Files pane.
If the ReNamer's window is not visible, firstobscured, drag yourthe selection onto ReNamer'sits tasktaskbar button inand Windowspause Taskbarbriefly (normally located atuntil the bottomwindow ofcomes your desktop). Wait for a couple of seconds without releasingto the LMB.foreground. The ReNamer window pops up, and stays above other application windows on your screen. Now you can move your mouse over the ReNamer window and drop your selection of files.
Adding files using thecopy copy-and-and paste method
Select the files in any application and press CTRL+Ctrl+C, to copy them into the clipboard. Nowthen switch to ReNamer and press SHIFT+CTRL+Ctrl+Shift+V.
Note that:that the paste shortcut is Ctrl+Shift+V, not the standard Ctrl+V, and the Files pane does not need to be focused for it to work.
Adding files by importing a list
ReNamerImportdoesfilesnotfromusetext-listtheorusualplay-listkeyboardloadsshortcutfileCTRL+V.paths from a plain text list (one path per line) or a playlist file in M3U or PLS format.ItImportisfilenotpathsnecessaryandtonewclick inside theFilespane for thepastenamesoperationloadstofilework.paths together with predefined new names from a CSV or tab-separated TXT file.
Removing files or folders from the pane
If you have added more files by mistake, you can remove them easily in just two steps:
Changing the order of files in the pane
Certain rules (e.g. the Serialize Rule) act on the list of the files in "top-to-bottom" order, as opposed to acting on each file independently. In such cases, each file gets its name based on its position in the list. For example, the Nth file in the list is named Track-N.mp3.
Normally, the files are listed in the order you added them to the pane, with the the most recently added files added to the bottom of the list. But you can change the position of the files in the list. Just click on the file and drag it to the new position.
You can also select multiple files and drag all of them as a group to the new position.
Sorting files in the files pane
You can sort files in the Files pane by any column with just a click on the column title. The little triangle will show up to indicate the order of sorting. For more information have a look at the full article on sorting files.
Selecting files
You can carry out various operations on selected files.
To select one or more files:
Ordering files in the rowsFiles touchedpane
Some rules, such as the Serialize rule, process files in top-to-bottom order, so position in the list matters. By default, files appear in the order they were added, with newer additions at the bottom.
To reposition files manually, click and drag a file to the desired location. Multiple files can be dragged as a group. To sort by thea rectanglecolumn areautomatically, selected.click
Whenfor selectingmore only one row, use Up and Down arrow keys to change the selection to adjacent row.detail.
Marking and unmarking files
AMarking is independent of selection. Only marked files are previewed and renamed. Unmarked files are skipped entirely.
Unmarking a file is marked by putting a tickconvenient inway itsto check box 
. Conversely,exclude it isfrom unmarkedrenaming bywithout removing it from the tick 
.pane.
ReNamerTo acts only ontoggle the marked files.state An unmarked file is neither previewed nor renamed.
So unmarkingof a filefile, isclick usefulits tocheckbox, exemptor a file from renaming, without having to remove it fromselect the Files pane.
To mark/unmark the files:
Repeat of these actions on any item toggles its marked/unmarked status..
Note that the marked/unmarked status of a file has no relation with its selected/unselected status.